Aerobar Drink Systems.
By Tom Demerly.
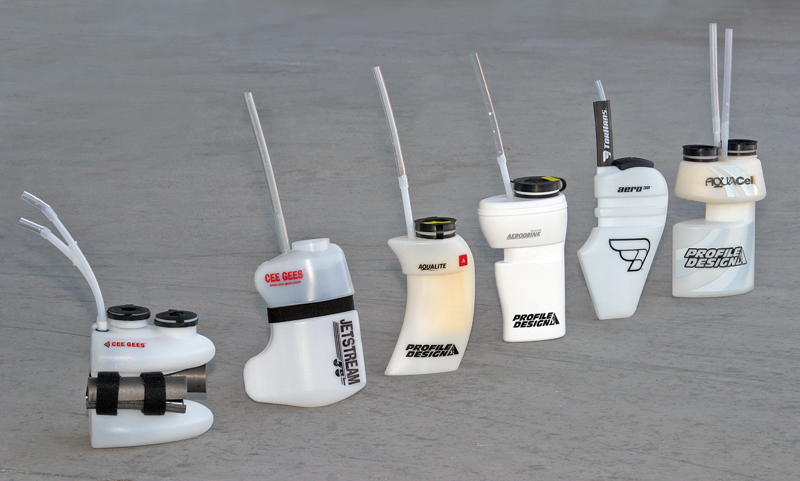
There are three places to carry fluids on your bike: Handlebar mounted systems, frame mounted systems and behind-the-saddle hydration systems. In this installment of our hydration system survey we review handlebar mounted systems.
Where is the Best Place to carry your Water?
From sprint distance to Ironman distance the decision about where to carry your fluids on the bike presents options. Handlebar mounted systems enable the rider to drink in the aero position without reaching or moving on the bike. Most handlebar mounted systems can be refilled from an aid station bottle on the fly- the empty bottle tossed back into the aid station for reuse. Some aerodynamic testing suggests certain handlebar mounted systems may improve the overall aerodynamics of rider and bike, being more aerodynamic than nothing at all.
No hydration system is effective unless you get the fluids into your body. Handlebar mounted systems are in your face, reminding you to drink frequently. A well designed, correctly installed system enables you to drink at full speed with almost no movement on the bike. The advantages are better body position aerodynamics and little effect on bike handling.
“The advantages of handlebar mounted aero drink systems are improved aerodynamics and little effect on bike handling. They are easier to drink from, meaning you’ll likely drink more.”
No handlebar mounted system is perfect. Even the best of the designs we surveyed require thoughtful setup and even some “improvisational engineering” to optimize their function. Because of the differences in triathlon handlebars manufacturers have a difficult time designing one system that adapts to all cockpits. You don’t have to be a mechanical engineer to adapt a system to your cockpit, but a willing sense of “do it yourself” will go a long way toward elegant mounting of handlebar drink systems.

Most systems we surveyed use two components: The bottle and an aerobar mount. The best of the handlebar mounts have a provision for width adjustment so they will work well on your existing cockpit without changing the width of your aerobars. No handlebar mounted system will work if your handlebars are too far apart, more than about 10 centimeters or 4 inches for Profile Design systems and up to 11 centimeters or 4&3/8ths inches for TorHans. Early systems such as Jetstream have rudimentary mounting systems that are light weight but require improvisation for good mounting.
The systems break into two categories: Full aero bottle systems with integrated drinking straws and simple cage mounting systems for using an existing water bottle and cage on your cockpit.

Aero bottle systems are the most popular, providing a drinking straw that protrudes upwards from the bottle. The straw is designed to be cut to length for the individual rider. One of the most interesting things I learned as a guest of Cervelo for a wind tunnel testing session at the San Diego Low Speed Wind Tunnel was that the straw is the least aerodynamic part of the handlebar mounted systems. The upward protruding straw produces an incredible amount of drag relative to its size. The lesson is to keep the straw as short as possible, or use the one system with a fairing built around the straw- TorHans.

Systems that provide a cage mount on the cockpit present a wide range of options for carrying fluids but are mostly “do it yourself” starting points where you’ll have to be a bit creative with their use and installation. Some bottle cages and bottles work better than others on these systems and creative engineering and testing by the end user is a must. These systems aren’t something you cobble together the night before a long ride or race.
The Systems I: Handlebar Aerodynamic Bottle Systems.
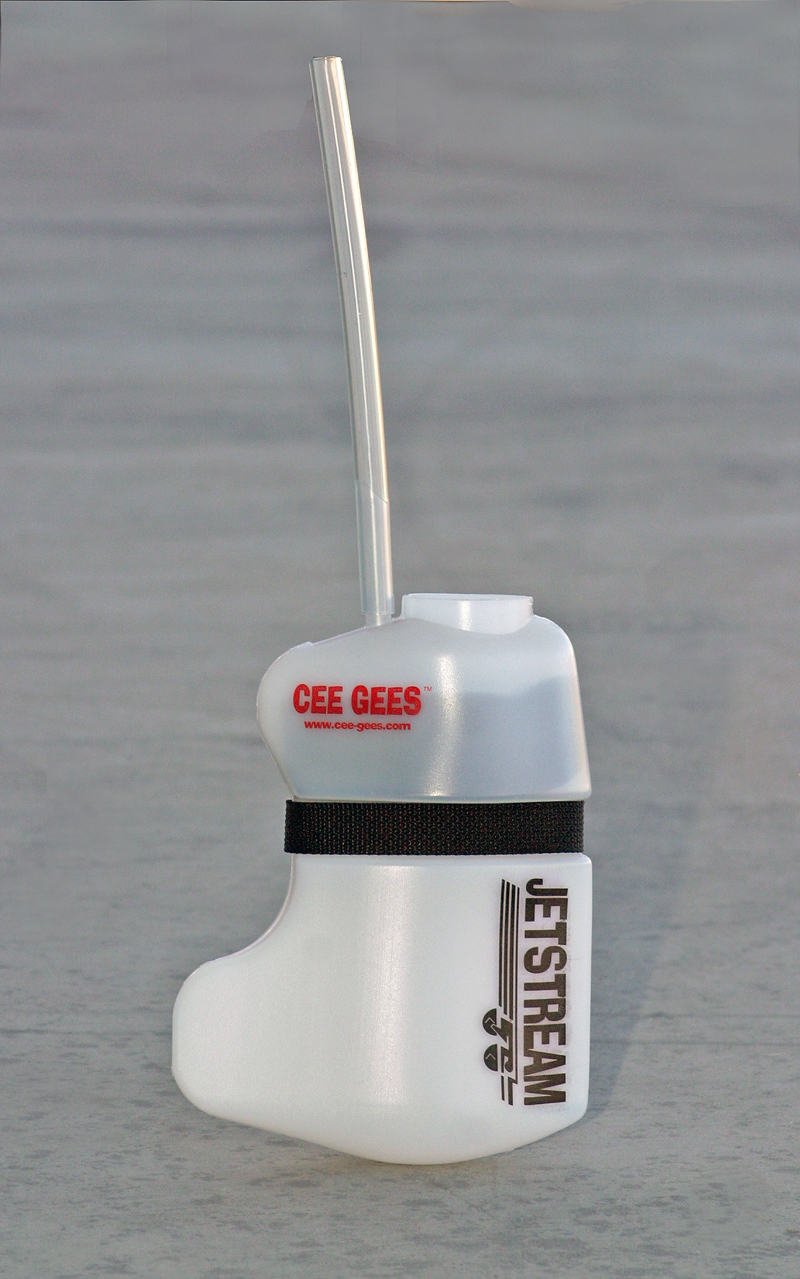
In the beginning there was the Jetstream aero drink system. The fact that this is still a viable contender in a changing category speaks to the integrity of its original design. The bottle design is solid. The people who distribute the Jetstream, Cee Gees (of aerobar elbow pad fame) suggest using a Profile Design Aerodrink Bracket as an alternative to their rudimentary strap supplied with the system, and so do I. You can also make the Jetstream aluminum mount work (sold separately). The aluminum mount is versatile since it is simple and adaptable (read: bendable). The bottle is packaged with a webbing mounting strap that can work perfectly if your aerobars are close enough together for the bottle to be wedged tightly between the extensions- then you use the strap to secure the bottle over the base bars and under the stem. It’s simple, lightweight, and works if your aerobar extensions are at the right distance from one another for the bottle to wedge tightly between them. The system is lightweight, streamlined elegance.
Jetstream advertises a 25 fluid ounce capacity. We crammed 30 ounces to the top with sponge and straw installed. The stock Jetstream does not have a “slosh cap” covering the opening but the sponge slosh guard inside the bottle is more effective than the dish scrubber style slosh guard inside Profile Design systems. My first thought was to borrow a slosh cap from Cee Gee’s other hydration system, the PodiumQuest, but when I did the outside diameter of the cap was just slightly larger than the inside diameter of the opening so the fit wasn’t effective. Fiddlesticks. The caps from Profile Design systems did not fit either.
The Jetstream System appears to be aerodynamically conceived and weighs 2.1 pounds filled to the brim with 30 ounces of fluid. It is also among the least expensive of the systems and the least expensive of the aero bottle systems.
Tom Demerly’s Rating: “ ★★★★” Four Stars out of Five. Simple, lightweight, elegant (if rudimentary) mounting. Inexpensive. Some mounting improvisation required, cut straw short for best aerodynamics.

The supertanker of the handlebar systems, we pulled away from port with a bladder-busting 47.5 fluid ounces of liquid in the two chamber system. Profile Design advertises 50 total fluid ounces, one compartment holding 15 ounces and the other holding 35 ounces. When full, the system weighs 4 pounds, about the same as a small cat. That is a lot of weight on your handlebars, and it does affect bike handling when full tending to make your steering more responsive.
Two straws mounted side by side access the separate internal reservoirs, an aerodynamic drawback since the exposed straws generate an odd amount of drag according to wind tunnel tests. The idea is to carry one type of drink in one reservoir, a different kind in the other, such as plain water and sports drink. The caps are excellent and there is a pot-scrubber style slosh guard inside each compartment. Cleaning is a little tricky since there are nooks and crannies inside the reservoirs.
The shape of the system is vaguely aerodynamic and the system mounts with Profile Design’s excellent Aerodrink Bracket. You’ll want to make sure this system is battened down well, eschewing the Velcro straps on the Aerodrink Bracket for zip ties for a more secure, albeit semi-permanent, installation of the Aerodrink Bracket.
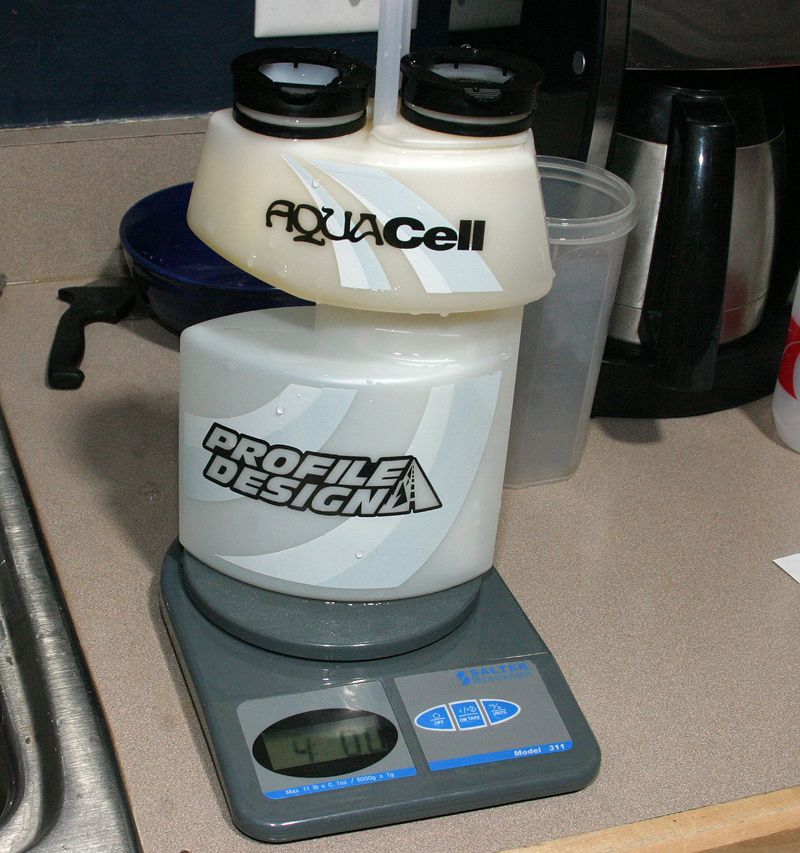
Do you need this much fluid on your handlebars? My answer: No. It’s too much weight, changes the handling of your bike and is tough to keep clean. For long distance training rides with no aid stations, it is a viable tool though. On race day, I’d prefer something lighter and easier to use since there is an aid station on the bike about every 5-10 miles at longer events and a smaller system will carry you through shorter ones.
Tom Demerly’s Rating: “ ★” One Star out of Five. Too heavy when full, can change bike handling, tricky to clean well, potentially not very aerodynamic. Does facilitate long, unsupported rides.
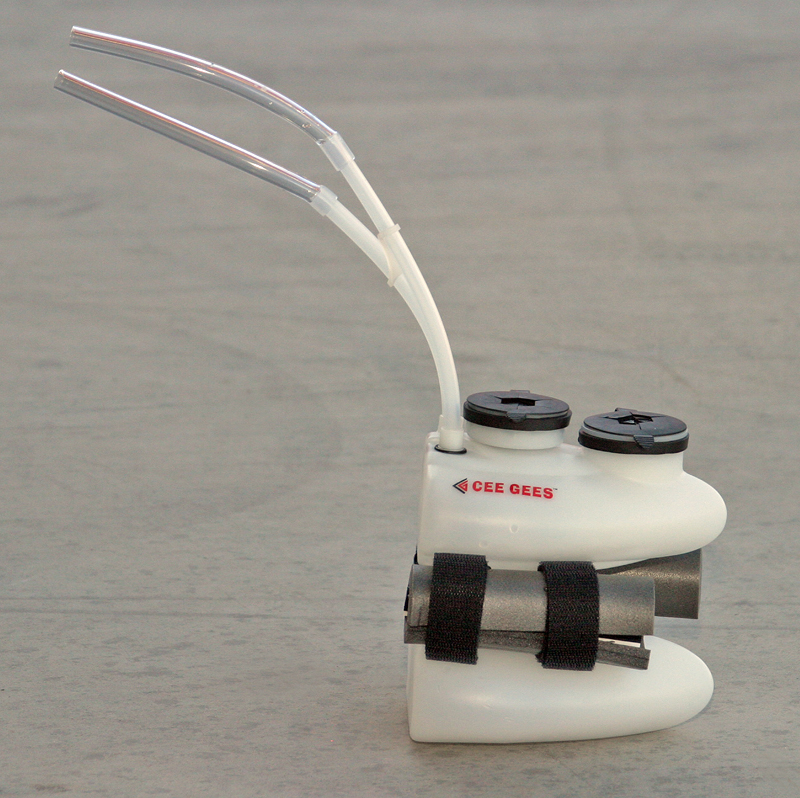
A two chamber system for carrying two types of fluids, the PodiumQuest is advertised at 50 fluid ounces. We fit 47 fluid ounces in there. Another large system, it is a full 3.7 pounds when full. The semi-triangular shape means more of the weight is close to the handlebar stem as opposed to out on the aero extensions possibly making handling a bit better than the Profile Design Aquacell when full.
The straws are side by side on the PodiumQuest, and attendant to the same aero drawbacks as the Profile Aquacell. The caps over each reservoir opening work well to control spillage.
A rudimentary mounting provision is included consisting of two rolls of closed cell foam that wraps around your aero extensions- the bottle attaches to the foam using a series of Velcro straps. The foam system, while simple, means the bottle won’t rattle on your aerobar extensions but may hit the front plate of your handlebar stem.
The PodiumQuest is a little more compact than the Profile Design Aquacell but does not mount as well as the Profile system. It’s a viable option for training and for race day if you must have your own two fluids and don’t want what is in the aid stations- and can tolerate the rather cobbled installation.
Like the Profile Aquacell I find myself not excusing the potential drawbacks inherent in the two chamber systems (weight, size, complexity) for the additional capacity.
Tom Demerly’s Rating: “ ★” One Star out of Five. Heavy when full, rudimentary mounting system, not easy to clean. Enough fluid to keep you in the saddle unsupported.
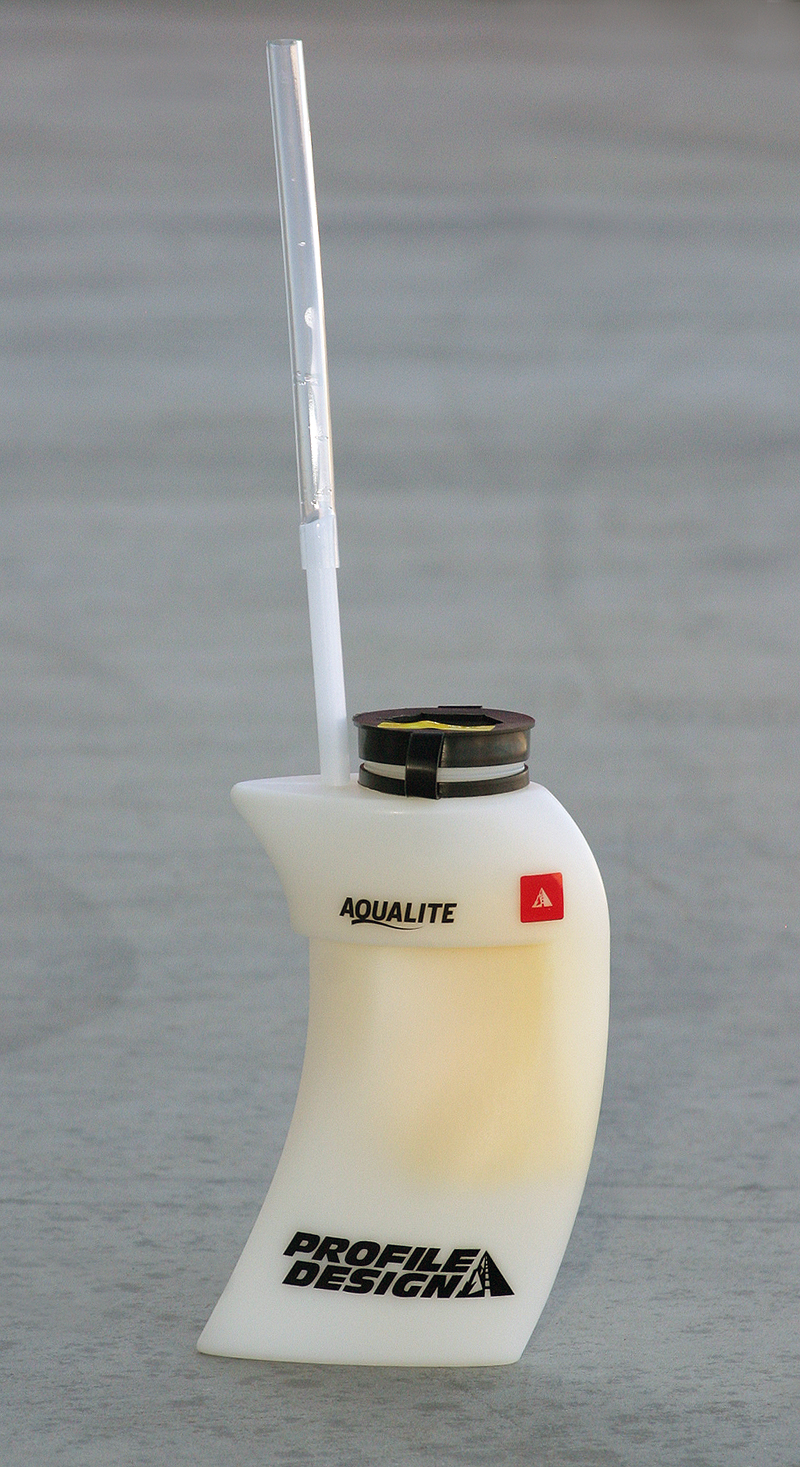
Simple, light and streamlined in design (if not entirely in aerodynamics) this is a very good system. It is relatively inexpensive and holds as much fluid as you need to get you from one aid station to the next for a refill, 25 fluid ounces to the top, 22 ounces advertised by Profile Design. That makes this a favorite for any distance event supported by aid stations.
The system mounts with the excellent Profile Aerodrink Bracket and uses their yellow pot-scrubber anti-slosh with the good Profile Design cap. Straw is cut to length and should be cut as short as functionally possible for best aerodynamics.
The Profile Design Aqualite is 1.6 pounds when full, a reasonable weight compared o the big, two chamber systems and the lightest of the single systems when full I’ve seen, even lighter than the TorHans 30 since it holds less fluid. That makes this unit a strong choice on hilly courses.
Other than a non-aero straw, a feature of all of the drinking systems except TorHans and less-than-optimal aero shape compared to TorHans, this is an excellent system- and a strong value. If the straw design were more aerodynamic it would have been five stars instead of four since it is inexpensive compared to the category leading TorHans.
Tom Demerly’s Rating: “ ★★★★” Four Stars out of Five. Compact design is relatively light even when full. Good mounting with Profile Design bracket. Cut straw to minimum length for lowest drag. Inexpensive.

Best in category.
TorHans claims their system is the most aerodynamic as verified at a number of wind tunnels including the A2 Wind Tunnel in Charlotte, North Carolina. A key component of the system’s claimed low drag numbers is the aerodynamically shaped straw fairing that the drink straw passes through. I’ve seen wind tunnel tests where the round drink straw was reputed to cause substantial drag, so providing a “fairing” around this makes sense in argument. TorHans provides substantial documentation on their website to support their low drag, best aerodynamics in class argument. Another factor in the aero argument for the TorHans system is the shape of the trailing edge of the bottle that puts it in close proximity to the head tube of some bikes, depending also on stem length. That also supports the lower drag doctrine more so than other systems.
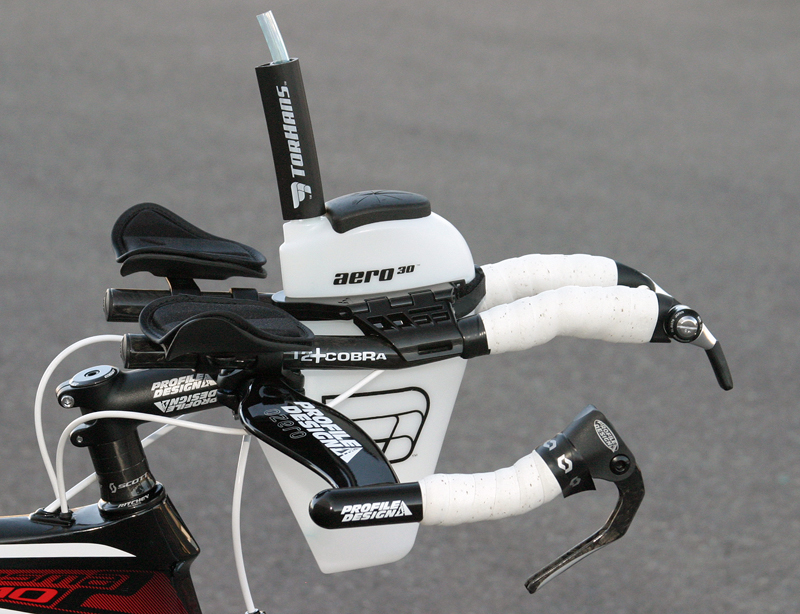
Even if you discount the aerodynamic claims of the TorHans system it is mechanically elegant. The handlebar mount, which is very “Profile-esque” comes packaged with zip ties for mounting, skipping the step of discovering Velcro doesn’t work as well. Two mounting slots molded into the TorHans bottle enable you to mount the system in a “high” or “low” orientation. This enables you to adjust the system’s vertical proximity and distance from the head tube of your bike- closer is better. TorHans also sells a device called the Aero Tray that uses the top mounting slot on the bottle (if you use the lower one to mount the bottle) and facilitates the carriage of a GPS system, power meter display or energy gel flask. This subverts the need for improvisational engineering to arrange your cockpit while still trying to stay light and aero. Even the cap of the TorHans is well executed and does away with the need for the yellow anti-slosh pot scrubber device as used on Profile Design. The pot-scrubber anti-slosh devices rob capacity and can trap taste and drink residue during a ride if you go from sports drink to water when refilling in an aid station. There will be some splashing when the system is full on rough roads.
With a 34 fluid ounce measured capacity (30 ounces claimed) and 2.1 pound filled weight this system is well suited for any distance from Sprint to Ironman. A smaller TorHans 20 system is also available with a claimed 20 ounce capacity.
TorHans continues to accessorize with a proposed Aero Skin neoprene cover to provide insulation for fluids in the bottle. You wet the neoprene and the combined insulation and evaporative cooling help to keep your fluids from becoming tepid. This utility of this accessory is lost on me since most of what you’re grabbing at an aid station is warm anyway and the moderate capacity of both of the TorHans systems mean you will be using aid stations to refill in longer events. One system does hold what you’ll need for an Olympic distance event. You’ll refill from a bottled grabbed in aid stations or at the party store for longer rides.
Minor concerns with the system are that it works best with the mounting bracket – and your aerobars- horizontal. As the mounting bracket angles up the entire system angles up making the straw angle down. The mount does not come with a Velcro strap to retain the bottle- I borrowed one from a Profile Design system. TorHans needs to include a small Velcro strap with the mount. One of our customers reported on our Facebook page an issue with excess spillage on bumps, mentioning that an anti-slosh sponge may have helped. It is easy to improvise an anti slosh device with a small sponge, pot scrubber, 3M pad or other implement. This rider may have been lighter weight, meaning road shock moved the front of their bicycle more on bumps than with a heavier rider. I don’t knick TorHans for this since, while being a valid observation, it is easy to improvise a solution (small sponge) and does not affect the middle 80% of users between 150-185 pounds.
The TorHans system is expensive, it’s only significant drawback, but I’ll suggest it is worth it since the bracket and bottle are both good with the bottle design relatively easy to clean with a bottle brush. It’s an elegant refinement that leads the category.
Tom Demerly’s Rating: “★★★★★” 5 Stars of Five: Best in Category. Claimed best aerodynamics, good fit, unique straw design, integrates other accessories with optional mount. Best with flat aerobars. Expensive, but worth it.

Profile Design Aerodrink Insulated.
Slightly larger than the Profile Design Aqualite in outside dimensions and with the benefit of insulation the Profile Design Aerodrink insulated is a nice option for people who need to keep fluids cool. Using a similar cap, straw and pot-scrubber anti-slosh design and adapting to Profile Design’s excellent Aerodrink bracket the primary feature on this system is the insulation.
I’ve never bemoaned tepid fluids during a race or a ride, even living in one of the warmer climes (Tucson, Arizona) in the U.S. While the system works at keeping fluids a little cooler than a non-insulated bottle, it’s a solution for a problem that may not be worth solving- especially since fluids at aid stations are going to be relatively warm anyway. If something magical happened and the thing made your fluid cold, then I’d be on board.
That said, there is nothing wrong with the system except its dubious relevance, additional size and likely not super aerodynamic shape with the pronounced flat bottom and top. All the good features of the Profile Design Aqualite are here, but sometimes elegance is not when there is nothing left to add, but nothing left to take away.
Tom Demerly’s Rating: “★★★” Three Stars of Five. All the good features of the other Profile Design systems with the somewhat dubious addition of insulation in a larger package.
The Systems II: Cockpit Mount “Kits”.
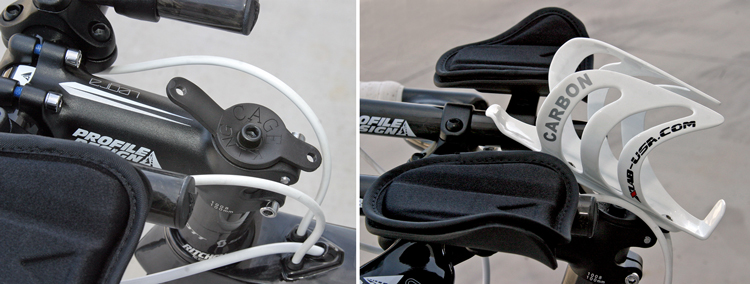
King Top Cap Bottle Cage Mount.
Brilliant. Simple. Cheap. The King Top Cap Bottle Cage Mount replaces your aheadset top cap; you simply use the included button-cap screws to mount a bottle cage to that. Voila! The system, if you could call it that, works elegantly and simply and doesn’t weigh much. Mounting is secure if you bolt it down tight, but it can rotate accidentally since an oversized bottle puts a lot of leverage on it. There isn’t much fore/aft adjustment for the position of the mount, only what is designed into your bottle cage.
For less than $10 this system is actually worth a try, and if you do decide to try it the simple elegance may be an easy, cheap solution to your aerobar hydration needs. As with all cockpit style bottle mounts the intention is for you to remove the bottle from the cage mounted to this bracket to drink. That isn’t as aero as drinking from a straw, but you can exchange bottles on the fly in an aid station.
Tom Demerly’s Rating: “★★★★” Four Stars out of Five. Elegant and simple; inexpensive. Simple solution to hydration systems. Not much positional adjustment and can work lose easily.
Profile Design HC Bottle Mount.
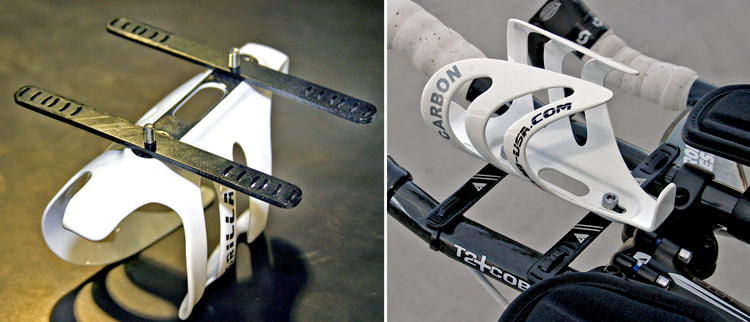
A super simple design comprised of two stripes of carbon fiber and four zip ties. Add a bottle cage and bolts and you have a system that mounts almost anywhere along the length of your aero extensions. Likely the lightest system available, it adds almost no weight except for the bottle and cage.
As with most of these “kit” style systems that rely on a conventional bottle and cage this is a little less than robust. The flex inherent in the system can make bottle removal and replacement a little… “soft”. You trade off some stiffness for a lot of weight savings.
There isn’t much latitude for aerobar width on this system even thought the little carbon supports have a number of width sizing slots. On our test version the clear coat finish had flowed into the sizing slots making installation impossible until we cleaned out the hole with a number 11 X-Acto knife blade.
The system is inexpensive and great for tinkerers but not very robust. As with all systems that mount a bottle between your hands you have to spend some time determining where it will be most comfortable and easy to use when you are in the aero cockpit.
Tom Demerly’s Rating: “★★” Two Stars out of Five. Ultra-lightweight but flexible. Best for engineer customers who don’t mind tinkering to improve on a design or concept.

Another minimalist interpretation of the aerobar cage mount, this X-Lab design is ultra-lightweight at just a handful of grams. You bolt a bottle cage to it and you have a lightweight, aerodynamic drink system between your aerobars. The system relies on Velcro straps to anchor to your aerobars. It works better than my initial testing indicated because I tested it with the wrong bottle cage. In the photos above you see an X-Lab Gorilla cage mounted on the Torpedo Mount. That wasn’t good choice for the Torpedo Mount since the Gorilla cage has very high bottle grip and is designed predominantly for behind the saddle bottle carriers. A a result I had difficultly getting bottles out of and into the X-Lab Torpedo Mount with a Gorilla Cage. Engineer Craig Turner, founder of X-Lab, was kind enough to point out that I was mixing the wrong equipment. The X-Lab Chimp is a better choice of a cage for the X-Lab Torpedo Mount. With the X-Lab Chimp cage the X-Lab Torpedo Mount works quite well. I like X-Lab equipment very much and this design confirms their solid approach to design and engineering for specific purposes. You do need to monitor the velcro to be sure it stays snug, especially after bike washing, roof rack carrying in the rain, etc. Seeing the simple elegance of the flat carbon fiber plate made me instantly start conjuring up ideas using some kind of lightweight hose clamp or zip ties for a more robust mount, but if you use the right cage this system is a good design that weighs nearly nothing.
This product is a strong idea in minimalist design that integrates well with the rest of X-Lab’s products.
The X-Lab Torpedo mount isn’t cheap at about $50, but carbon fiber is an expensive material that is becoming even more expensive as supplies dry up and demand increases. Overall this system reflects X-Lab’s excellent engineering approach to hydration design, and I am a big fan of both Craig Turner and X-Lab.
Tom Demerly’s Rating: “ ★★★★” Four Stars out of Five. Light and elegant, the Velcro mounting is slightly flexible so use X-Lab Chimp cages.

