By Tom Demerly
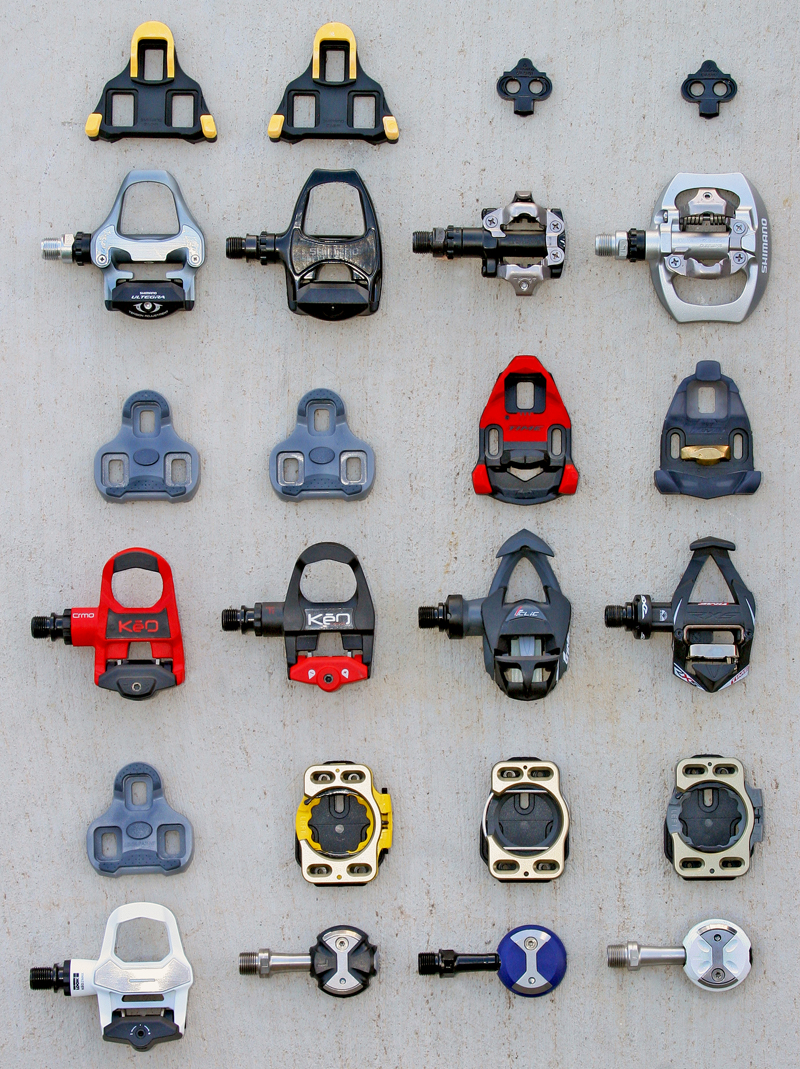
Clipless pedals, pedals that mechanically engage the shoe, may be the single largest upgrade a new rider can make. This article will provide an overview of popular systems and insights into choosing a pedal system that is appropriate for you, along with tips on selecting the right pedal and avoiding bad choices.
Clipless pedals provide an enhanced margin of safety compared to toe clips and straps by allowing the rider’s foot to disengage from the pedal if the angle of the foot to the pedal exceeds a certain amount; as in a crash. With toe clips and straps your feet may come out of the pedals if you fall, but they may not. There is no designed-in escape mechanism in a toe clip but clipless pedals have a designed-in safety release.
Clipless pedals increase pedaling efficiency by transferring power from the leg to the bike more efficiently. The best orientation of your foot on the pedal changes slightly as your pedaling force and speed change. Pedals with “float” enable the rider’s foot to move naturally to the optimal orientation on the pedal for changing pedaling rates (cadence) and changing amounts of pedal force.
A Brief History of the Modern Clipless Pedal.
While crude examples existed since the early 1900’s, including the Cinelli “death pedal”, the modern clipless pedal was invented by the French inventor Jean Beyl, an early innovator of spring release ski bindings. In the early 1980’s Beyl designed an “automatic safety pedal” while working for the Look ski binding company. That pedal became the “Look” pedal.
Early white Look pedals and the later all black Look “Racing Pedal” were heavy and held the rider’s foot in static alignment with the pedal; your foot did not move. Beyl went on to develop a new technology that introduced lateral (side to side) and rotational movement, known as “float”. Beyl discovered that if the pedal allowed the foot to find its natural orientation performance was enhanced. He was also the first to formally acknowledge that the geometry of the foot changes on the pedal. The cleat/pedal interface ought to accommodate that for optimal performance and safety.
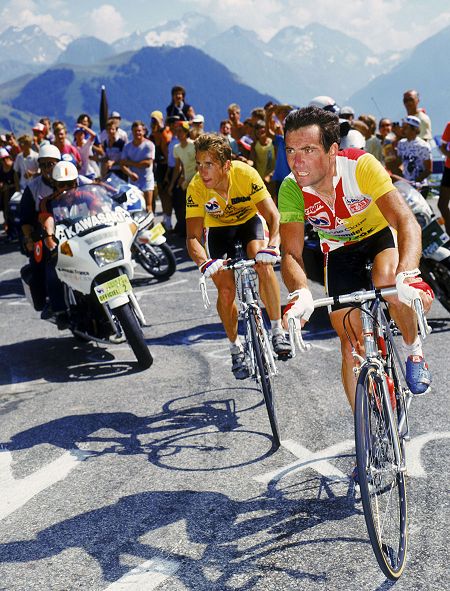
Beyl attempted to convince Look to include rotational and lateral movement into their pedal designs, but business pressures prevented a change in design. Beyl left Look in the late 1980’s to partner with two French businessmen to start a company called “Time Sport”. He introduced the Time Pedal with rotational and lateral movement built in. Under the U.S. direction of the charismatic French businessman Jean-Pierre Pascal, Time Sport grew rapidly. In 1989 the majority of riders in the Tour de France, including winner Greg LeMond, were using Time pedals. Top pro riders switched to Time pedals because they felt it extended their careers and limited exposure to knee injuries. Since Beyl introduced rotational movement in pedals with the first Time pedal, all pedals now incorporate some provision for rotational movement.
Picking Your Pedal: What Should You Buy?
Clipless pedal systems are commonly bought incorrectly. A search of forums like beginertriathlete.com produces many stories from athletes who bought clipless pedal systems at local bike shops unfamiliar with triathlons. The most common mistake first time clipless pedal buyers make is to buy two-sided, “walkable” clipless pedals like Shimano SPD mountain bike pedals for use in triathlons. While their reasoning seems sound, you can clip into either side and walk through transition areas with the shoes on without slipping, the drawbacks of added weight, small cleats and difficulty clipping into a small pedal system (even with two sides to clip into) soon surface.
Most first time clipless buyers upgrade to a road specific system quickly. Some are so discouraged by the difficulty of getting into and out of small-cleat SPD systems that they give up on clipless pedals and consider them as “dangerous”. This is largely due to poor equipment choice and set up.
Walkable mountain bike style shoes and pedals can also be difficult to install since the tread of the shoe can interfere with the engagement of the cleat to the pedal. This makes clipping in- and out- very difficult since the tread on the shoe may actually interfere with how the pedal functions. Good bike fitters and mechanics will test and prevent this when they set your pedals up.
Installing Your Pedals and Setting Up your Shoes and Cleats.
No matter what clipless pedal you buy you must have the pedals, shoes and cleats set up correctly. If you are new to clipless pedals it is best to have an experienced mechanic install your pedals, cleats, and fit your shoes. Setting up clipless pedals involves installing the pedals on your bike, fitting you for shoes and then installing the pedal cleats onto your shoes. Each of these three tasks requires experience. The most common basic problems setting up a clipless pedal system are:
- The left pedal is reverse thread so it does not loosen from pedaling forces. The installation of the left pedal is “Lefty Tighty”, not “Righty Tighty” as normal threads are.
- New cycling shoe customers usually buy shoes too large. Cycling shoes need to fit snugly and precisely. Movement of the foot inside the shoe will create friction and localized hot spots. Never buy shoes with “room for your feet to swell”. That adjustment is made with the closures on the shoe once it is precisely fitted to a non-swollen foot.
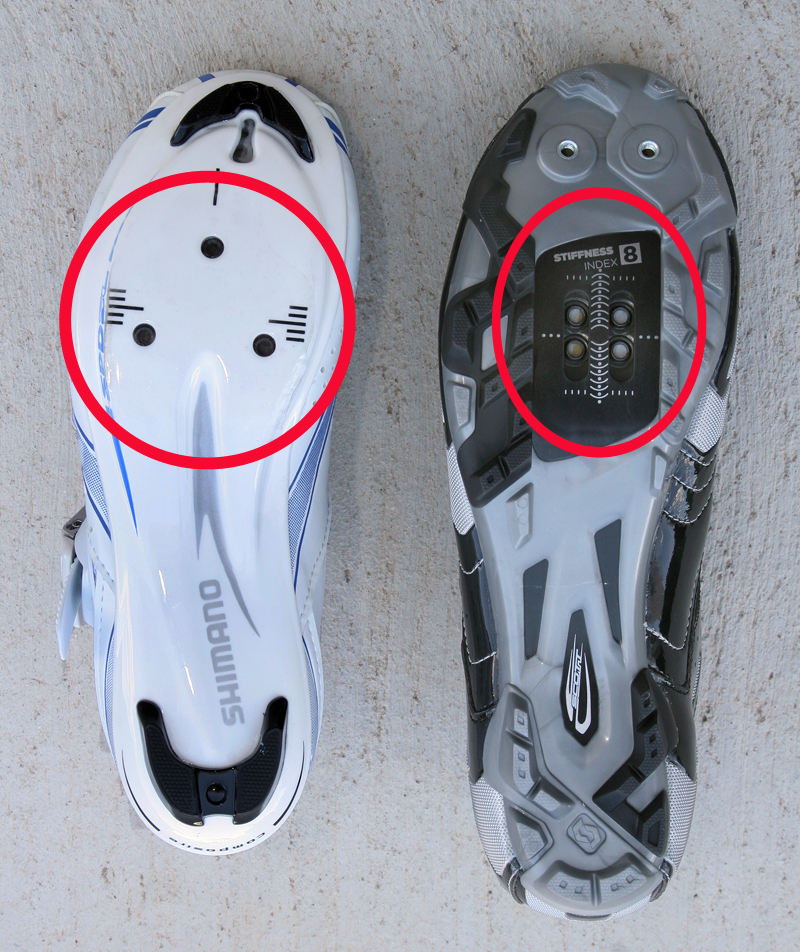
- Installing your cleats to an anatomically neutral position. The cleats are bolted to the bottom of your shoes and can be adjusted laterally (left to right), fore and aft and rotationally. If cleats are installed incorrectly they may position your foot at an uncomfortable and inefficient angle on the pedals. This could lead to injury and make using your pedals more difficult. An experienced and formally trained bike fitter can adjust your pedal cleats on your shoes to a neutral angle that does not place stress on your joints while pedaling.
Learning to Use Clipless Pedals.
You may have heard of riders “tipping over” when using clipless pedals without being able to remove their feet from the pedals. This can be due to a lack of familiarity with the pedal system, less-than-optimal or incorrect pedal and cleat set up or a combination of both.
The best way to learn to use your new clipless pedals is to set aside time specifically for learning how to use them. In other words, don’t try to use new clipless pedals on a training ride or race. Instead, set aside a specific time to learn how to put your shoes on correctly, mount the bicycle, clip in and begin pedaling without falling over.
An indoor trainer that holds your bike securely upright is a great tool for learning how to enter and exit clipless pedals in a controlled setting. You can’t fall over. You won’t run into something while you are looking down at your feet to learn how to clip in and out.
Once your mechanic and bike fitter has fitted you with shoes and installed your cleats and pedals they can provide an explanation of how your pedals and shoes work, give you a demonstration then you can have a practical application as you try the system yourself on the indoor trainer under your bike fitter/mechanic’s supervision and assistance.
For your first rides outdoors using clipless pedals find an area free of traffic with good pavement and no obstacles, such as a large empty parking lot, empty paved bike path without traffic or quiet subdivision where you can make right turns without having to stop frequently as your practice.
Clipless Pedals and Shoes: Two Basic Types.
Pedals and shoes can be broken down to two large categories: Three hole pattern pedals designed for road cycling and Two hole pattern pedals designed for mountain bike/off road riding and also some application in road touring.
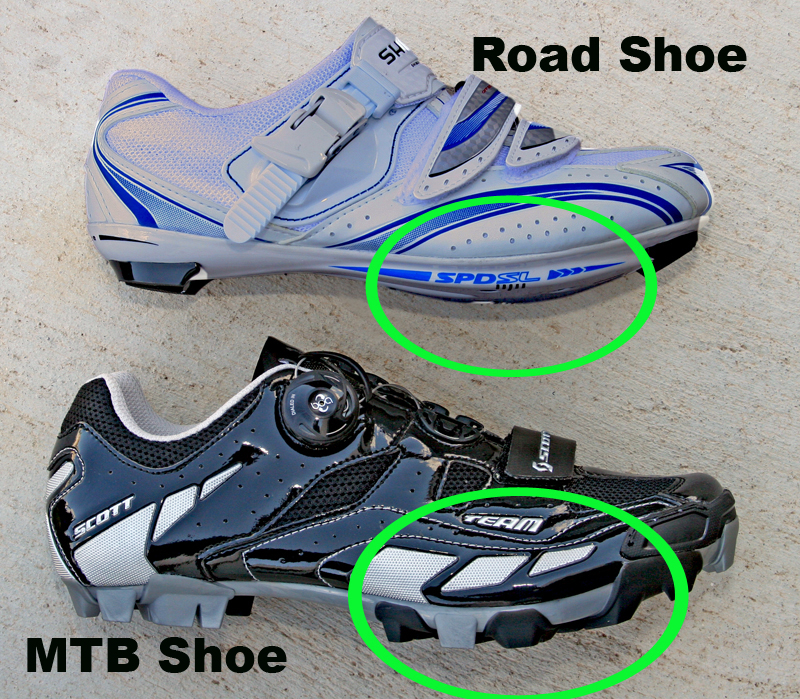
A common mistake new riders (and bike shops…) make is to sell entry level cyclists a “walkable” or two-hole pattern pedal system since they mistakenly believe it is easier to use. In general, buying a “walkable” shoe and pedal for triathletes and road riders is a mistake. The reasoning is the shoes are less slippery on pavement or floors to walk in. While this is true, remember that you are buying a shoe mainly to pedal your bike, not to walk in. Once new riders become accustomed to using clipless pedals they usually regret buying the heavier, lower performance “walkable” systems. Since pedal and shoe weight rotates and must be accelerated and decelerated every time you start and stop pedaling, a slightly lighter road specific shoe/pedal system will offer better performance (especially on hills) than a heavier “walkable” MTB style system.
If you buy a road cycling clipless system first it may take slightly longer to learn, but you will appreciate the performance and ease of pedaling quickly.
Pedal and Cleat Durability, Performance and Fitting.
Now that you know you need a road specific clipless pedal system and shoe if you are a road rider or triathlete it’s time to learn more about what factors influence pedal performance and safety.
Closer is Better. Simpler is Safer.
It’s a reality that we usually don’t maintain our equipment as often as we should. Clipless pedal systems- pedals, shoes and cleats, require regular maintenance for performance and safety. The more complex the system becomes, the more maintenance it will require.
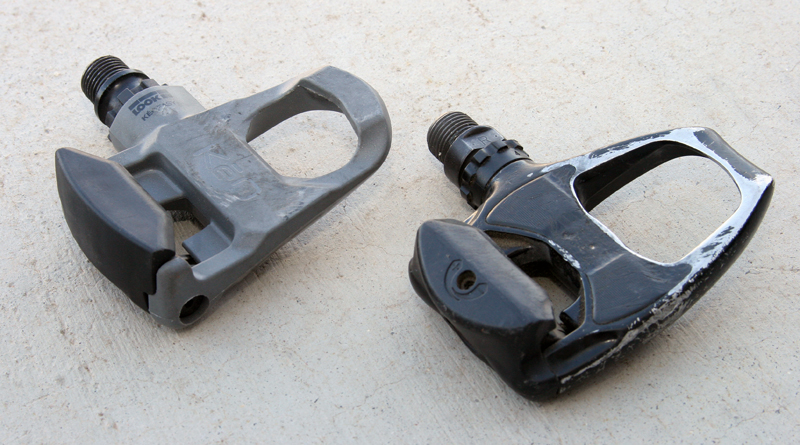
The most important clipless pedal maintenance is keeping the system clean and the cleat fasteners tight on the shoe. This requires frequent inspection and cleaning, and should not be ignored.
Since maintenance is important in clipless pedal use, the simpler the system is (cleats, pedals and shoes) the easier it will be to maintain and the more likely you will be to actually do it. You can wash your pedals off with a soft brush, soap and water- same for your cleats on the soles of your shoes.

Worn pedal cleats change the way your bike fits and may not release the way they are designed. They may release without warning, or they may not release when you need them to. Worn pedal cleats are also prone to breakage. This could contribute to a crash. Cleats often wear differently on each foot since we tend to put one foot down at stoplights over and over. That foot will wear faster. Again- inspect your pedals and cleats frequently for wear, dirt and damage. Check the pedals to be sure they do not have excessive “play” or movement at the axle. Pedals with worn bearing may fail suddenly and come off the crank arm entirely.
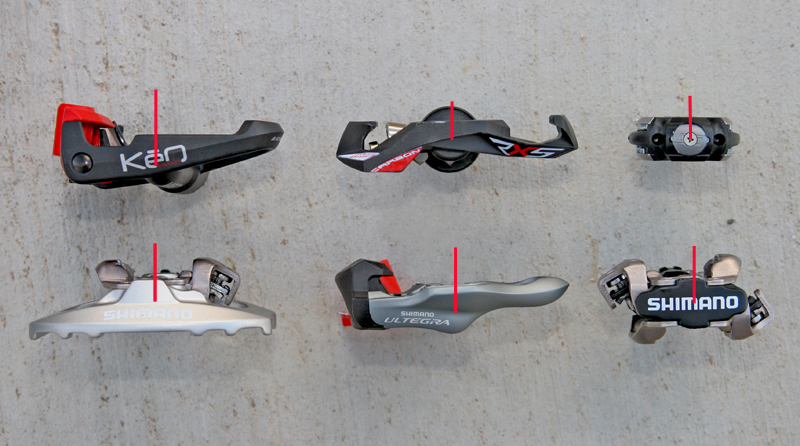
With very few exceptions clipless pedals tend to work better when the pedal axle is closer to the ball of the foot, both front to rear and in height. For this reason pedal and shoe designers try to keep the sole of cycling shoes thin and stiff and the distance from the center of the pedal axle to the place where the ball of your foot is inside your shoe as minimal as possible. This reduces a phenomenon some pedal designers refer to as “rocking torque” and engineers sometimes call “angular torque”. If you think back to your first tricycle, which may have been equipped with wood pedal blocks so you could reach the pedals, it was difficult to keep the pedal under your foot when you pressed down hard. Unless the application of forces was in perfect vertical alignment with the pedal axle through its rotation, your foot tended to veer off the pedal. That is rocking torque- the bigger your pedals blocks the harder it is to apply pedal forces accurately.
Shims? Wedges?
There is a trend among some bike fitters to use “shims” or “wedges” to “tune” or “optimize” your pedaling and power transfer with clipless pedals. The logic is a straighter pedaling motion where the knee moves up, down and around the pedal circle is more efficient and anatomically correct. These wedges and shims attempt to align the movement of the knee and leg throughout the pedal stroke, making it appear straighter.
In general bike fitters- with very few exceptions- do not have the formal training in anatomy and physical therapy to competently administer shims and wedges. They often do more harm than good, “fixing” problems that sometimes don’t exist or are better addressed by a qualified physical therapist, more training or both.
Most joint alignment is facilitated by the normal physiological development of a new cyclist, and it changes as the cyclist develops. Very few professional cyclists use wedges or shims. As a cyclist trains their body acclimates to maintain an efficient pedal stroke- and that stroke may not necessarily be in perfect visual alignment. Some cyclists, including top professionals like Tour de France winner Jan Ulrich, pedal naturally with asymmetrical alignment. Ulrich’s knees move outward at the top of the pedal stroke to such a degree that Tour announcers Phil Liggett and Paul Sherwin described his style as “ungainly”. It didn’t keep him from winning the Tour de France.
Because a straighter pedaling alignment isn’t always optimal and bike fitters lack the diagnostic capability to determine what is optimal shims and wedges should be avoided. In medically verified instances such as a skeletal leg length discrepancy or other orthopedic indication verified by X-ray from a licensed physical therapist that specializes in sports and cycling, shims may provide a benefit- but leave the shims and wedges to the medical community, not the bike shop.
The Brands and Systems: A Thumbnail Guide.
Shimano: Road and Off Road “Walkable” MTB.
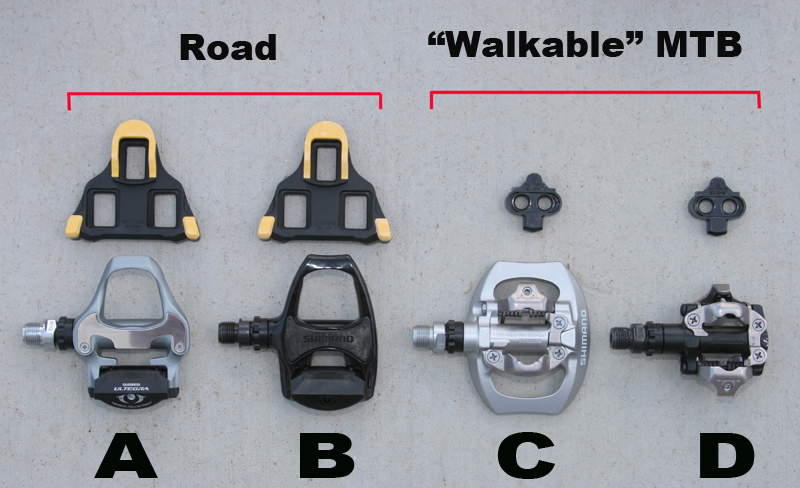
Shimano makes a number of road and off road pedal systems that include “walkable” systems for casual, recreational and mountain bike use and dedicated road systems used by top professionals like Lance Armstrong.
The “walkable” Shimano SPD/MTB pedal systems work with a shoe that is easier to walk in than traditional road cycling shoes but not a good choice for triathlons or road riding due to the small cleat size and heavy weight. They are frequently bought by entry level cyclists and triathletes who soon realize they should have bought a dedicated road system such as the PD-6700 Ultegra or PR-R540 road pedal.
Here are a few of our favorites:
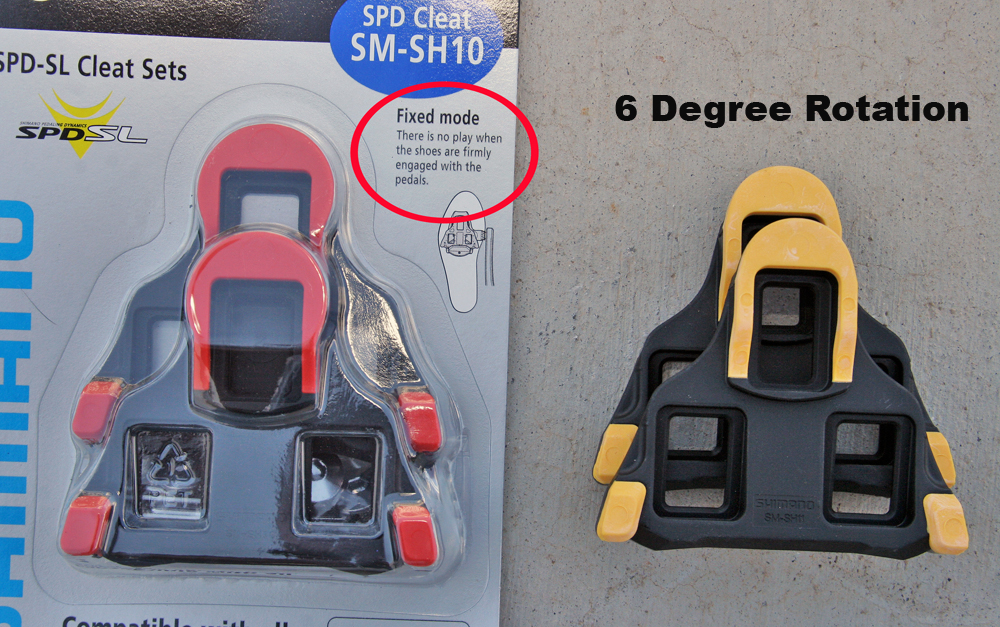
A. Shimano PD-6700 Ultegra pedals are a wide body, large platform pedal that is all alloy construction. The system uses a three-hole “Look compatible” cleat system. Two cleats are available for this syste m; a rarely used SM-SH10 red and black cleat with fixed position (no “float”) and the commonly used SM-SH11 yellow and black with 6 degrees of angular rotation. This pedal has a proven track record and is well suited for riders with larger feet above size 9 US
B. Shimano PD-R540 pedals are value priced, large platform, all alloy clipless pedals that use the three hole “Look compatible” mounting pattern. These are an excellent value and strong first time pedal choice. The pedal uses the SM-SH10 fixed and more commonly the SM-SH11 floating cleat with 6 degrees of angular rotation.
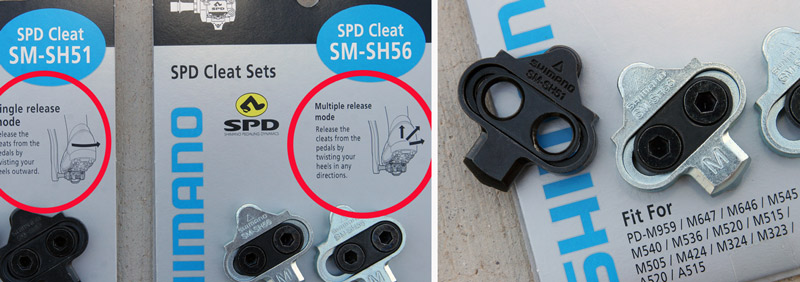
C. Shimano PD-A530 pedals are a dual use pedal with a mountain bike style SPD clipless pedal on one side and a large, flat platform on the other for use with normal street shoes. This is a casual/recreational use pedal good for short distance commuter bikes or coffee shop bikes. The pedal is heavy and not intended for triathlons or performance riding. Because it uses the smaller SPD MTB two-hole pattern metal cleats, SM-SH51 Single Release and SM-SH56 Multi Release. SM-SH56 Multi Release is recommended for easy entry and exit. The PD-A530 works with “walkable” shoes but, due to the small cleat size, can be slightly tricky to get into for new users.
D. Shimano PD-M540 MTB pedals are a two sided, off road specific pedal for mountain bikes. The pedals use the smaller SPD MTB two-hole pattern metal cleats, SM-SH51 Single Release and SM-SH56 Multi Release. SM-SH56 is recommended for easy entry and exit. This is another pedal frequently bought by first time triathletes and road riders who want a “walkable” shoe but quickly find out there are performance compromises.
Look Keo Clipless Pedals.
Perhaps the most popular road pedal. Look invented the current version of the popular clipless pedal and has refined their designs consistently every since. There are many versions at widely varied prices.
Among many benefits to Look pedals is the easy availability of pedal cleats. Since the pedal is so popular almost every bike shop has replacement cleats in stock. This is a boon to the triathlete who travels frequently. The down side is the plymer cleats can wear quickly with frequent walking. These cleats need to be checked for wear regularly.
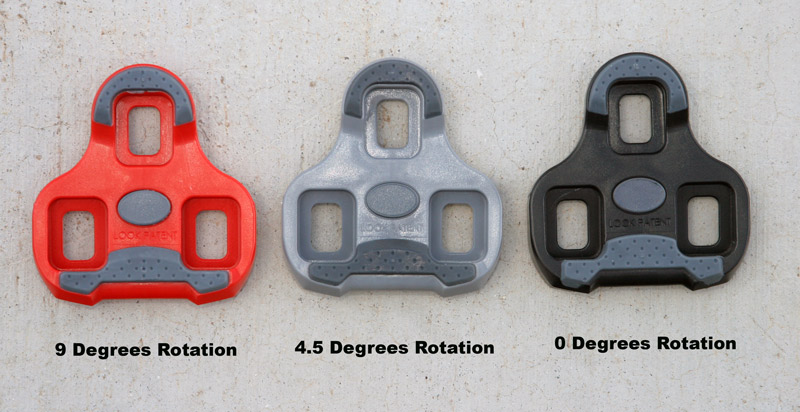
Look has recently introduced their new Blade pedals but the Keo and Keo Max continue to be the most commonly used. Look Keo and Keo Max pedals can be used with either of three different Keo cleats that provide no rotational movement (black), 4.5 degrees of rotational movement (grey), or 9 degrees of rotation (red). The grey 4.5 degree version is supplied in the box with pedals and is the most commonly used.
There are two versions of Look Keo cleats, the normal version and the more recent “grip” version with grey polymer traction pads on the outside of the cleat to prevent you from slipping when walking on smooth surfaces. The grip version in grey 4.5 degrees rotational movement is supplied in the box with Look Keo and Keo Max pedals.
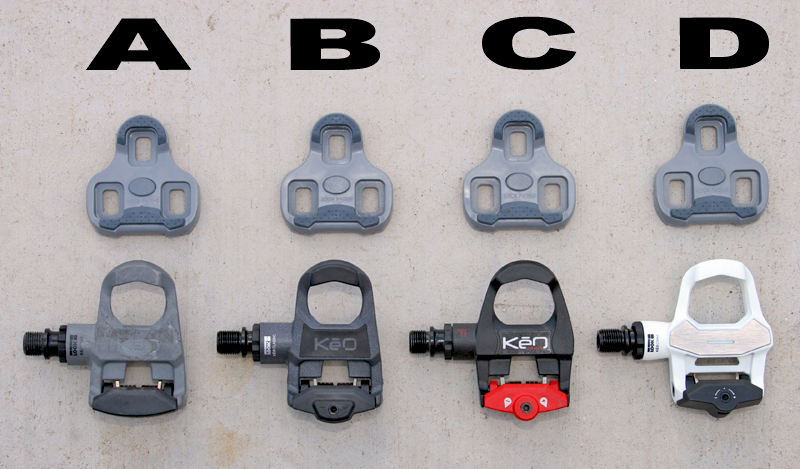
A. The Keo Easy is the full size road clipless pedal specifically designed for first time clipless pedal users. This pedal come with a lower release tension spring for smaller riders. The light spring enables riders to clip out of the pedal easier. This pedal uses either of the three Keo cleats and is supplied with the grey 4.5 degree rotation cleat. It is a good choice for new users but second year athletes frequently want to upgrade.
B. The Keo Classic is extremely light considering its price which makes it an excellent value at under $120. This pedal uses adjustable binding release tension and comes with the grey 4.5 degree rotation cleat. This is a pedal system most riders will never “outgrow”. It is a true performance oriented clipless road and triathlon pedal at a great price. Other than relying on a plastic cleat that tends to wear quickly with contact to pavement- as with walking and stopping- this pedal has very few drawbacks.
C. The Keo Carbon has recently been replaced by the Keo 2 Max Carbon. The original Keo Carbon is slightly narrower than the new version and is being phased out in favor of the new Keo 2 Max Carbon. It is a capable, lightweight professional pedal that includes a molded carbon fiber impregnated body for increased stiffness and a lightweight titanium axle.
D. Look’s newer Keo 2 Max pedals use a wider platform and brushed metal surface to facilitate better “Arc” or rotational movement on the pedal. These wider platforms may feel more stable underfoot to some riders, especially with inexpensive plastic, non-carbon fiber reinforced shoes. The pedal remains relatively light even in the wider width due to the molded polymer body which is incredible durable. There is adjustable binding tension and a sub $200 price tag making this a strong contender. This wider pedal body design is the direction most pedal users are trending toward. The pedal is sold in two colors, white and grey.
Speedplay X, Zero and Light Action Clipless Pedals.
Speedplay inventor and clipless pedal expert Richard Byrne is such an authority on clipless pedals he is actually the “curator” of a museum of clipless pedals at Speedplay’s headquarters.
Speedplay has a proven competitive record in the top races and triathlons, used in the Tour de France and the most popular pedal choice in races like the Ironman World Triathlon Championships.
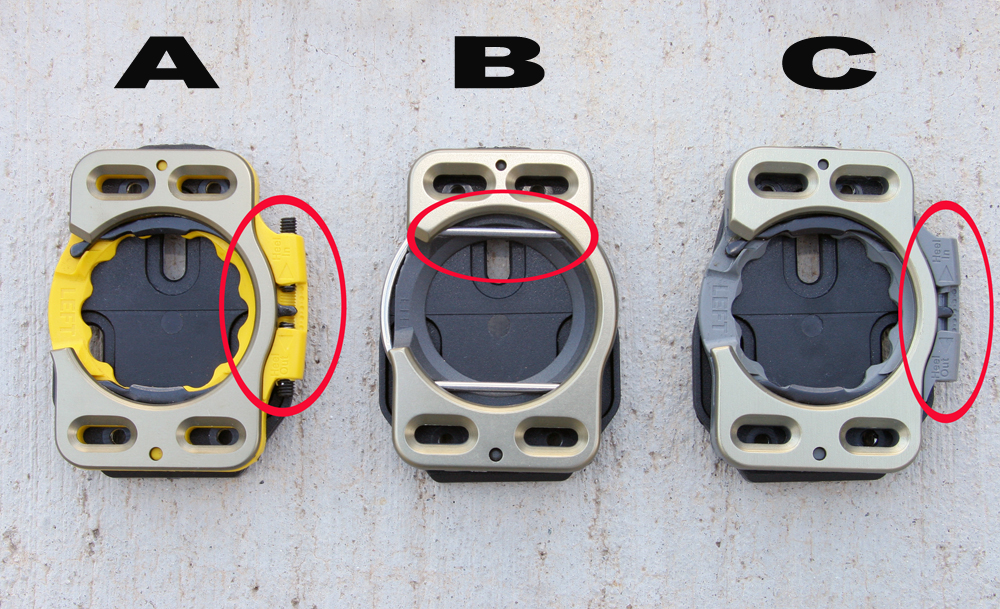
There are many advantages to each of the Speedplay systems including light weight, rotational movement from the center of the pedal (as opposed to rotating from the toe on other popular systems) and a high degree of “fit-ability” to individual riders.
Speedplay’s method of clipping in is different from pedals such as Shimano road pedals, Look Keo and Time. The majority of road specific pedals clip-in by engaging the toe first in a forward sweeping motion, then clamping down the heel. This prevents the foot from slipping forward off the pedal platform. Speedplays seem to engage from the rear of the pedal more effectively, and this takes a little learning. Because the pedal is two-sided it can be clipped into from either side. You don’t have to worry about having the pedal right side up.
The system does use a lot of bits and pieces in the cleats. Since the system is so “fit-able” it works best for athletes who have ready access to mechanics and bike fitters. Speedplay pedals tend to work best when kept clean and the cleats lubricated. They rely on good quality shoes with relatively stiff soles for optimal performance. The systems should be checked for wear, as with any system, regularly. Speedplay has a tendency to develop a “rocking” action as viewed from the front or rear if your pedals or cleats are worn- like pronation or supination on a running shoe. On smaller shoe sizes compensation shims are used to moderate the curvature of sole of the shoe. It’s important to use Speedplay’s torque specifications when installing the cleats since over-tightening the cleats is easy and they require light torque.
Some rider’s describe the free rotation from the center of the pedal in Speedplay as odd initially, with comments like “standing on an ice cube” being common. This passes quickly as riders adapt.
The Speedplay system, beginning with “X” series pedals, have evolved into other versions but remain effectively a round pedal with refinements to the body and cleat for different features. In early 2011 rumors of a complete Speedplay redesign began to circulate as did mention of a Speedplay pedal with built-in power meter.
Speedplay’s retail distribution policy restricts mail order sales except from selected vendors, and unfortunately as of this date, TriSports.com is not one of those retailers.
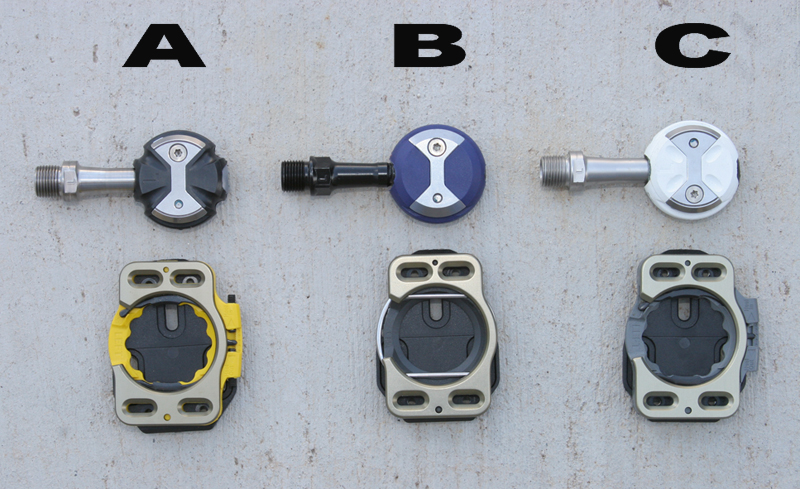
A. The Speedplay Zero is the most commonly sold Speedplay pedal in triathlon. It features adjustable rotational movement and the new solid spring design to resist dirt-fouling. The pedal is sold in a dizzying assortment of colors and three different spindle materials including cro-moly, stainless steel and titanium.
B. The Speedplay X Series is the “original” Speedplay pedal, largely unchanged for more than a decade. It is still a good enough design to be used in the Tour de France and Ironman World Championships. This pedal has 14 degrees of “free rotation” that may take some riders a little getting used to. Once up to speed and pedaling the free rotation isn’t noticed. The X series uses the bar-type retention spring which needs to be kept clean. If you put your shoes on in T1, the swim to bike transition, and run across dirt or sand your cleats may “dirt foul” preventing you from clipping in until you spray the cleats with a water bottle to rinse them clean. Cleat covers called “Coffee Shop Caps” are a popular option to keep cleats clean but are inconvenient to remove and store during a race. This system works best when you keep your shoes clipped to your pedals in T1- then don your shoes while rolling after mounting your bike, a technique you must practice before race day to do safely.
C. Speedplay Light Action pedals are the “easy to use” Speedplay model aimed at entry level clipless users. These have full rotational movement and a lighter spring for entry and exit. This pedal uses the flat spring that resists dirt fouling. Sold in many colors. This is a great system since it incorporates all the features and benefits of the other Speedplays but in a model geared toward the new clipless pedal user.
Time Sport Clipless Pedals.
Time pedals were innovated by the popular inventor of the clipless pedal, Jean Beyl, in the late 1980’s. They have been used by the top competitive cyclists and triathletes around the world at Ironman and were the most commonly used pedals in the Tour de France when they were released. Now that other companies have incorporated rotational movement into their designs Time’s dominance has diminished, but not their performance.
The Time pedals were the first to incorporate rotational movement or “float” into a clipless pedal. They also have adjustable “Q Factor” or width and the ability of the foot to position itself laterally on the pedal.
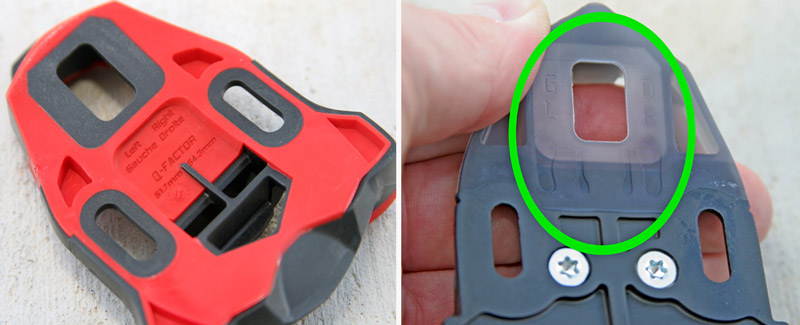
Another unique feature of Time pedals is the concept of “Re-centering Force” or a moderate and adjustable amount of spring tension that supports the foot toward a neutral posture on the pedal while allowing it to move freely during forceful efforts.
Time has also designed their pedals to have optimum “Bioposition” or close proximity to the pedal axle to reduce rocking torque and improve pedal feel and efficiency.
Finally, the pedals are adjustable for “Q” factor or width by changing the cleats from one shoe to the other.
In general Time is an under rated and not entirely understood pedal system. Both the founder of TriSports.com, Seton Claggett, and this author use Time pedals.
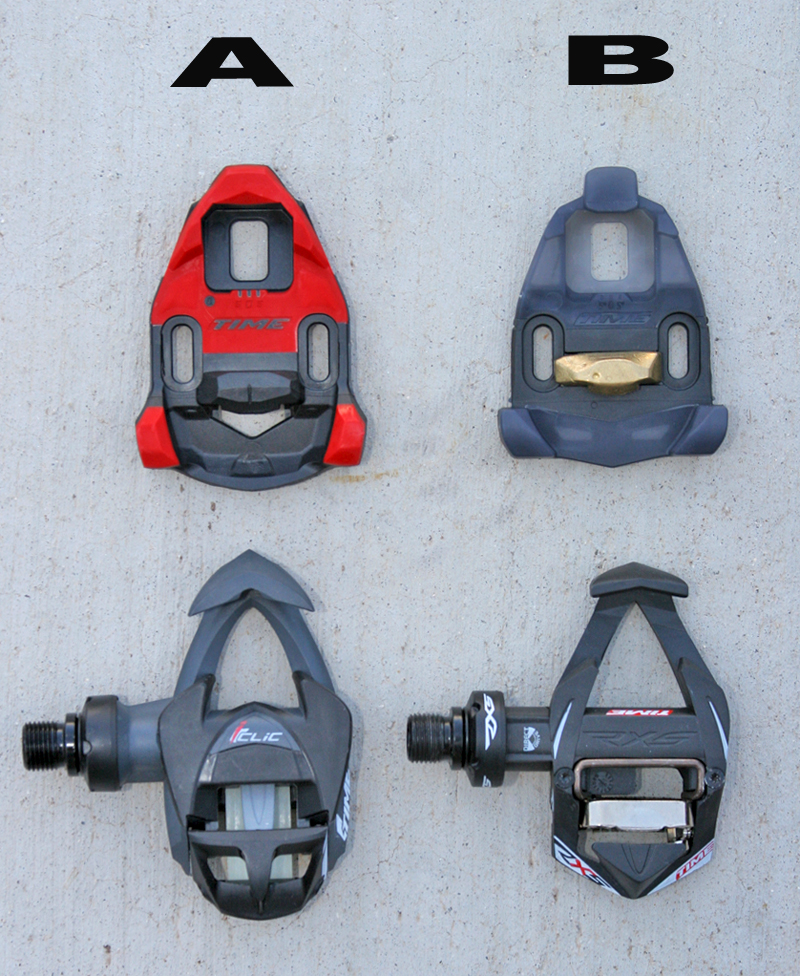
A. The new Time i-Clic is made in five versions with different pedal body materials and one version with a titanium spindle and carbon impregnated body for ultra-light weight. The i-Clic uses a more robust pedal body design and fortified cleat compared the earlier RXS. This makes both pedal and cleat more durable but slightly heavier.
B. The RXS is sold in three versions, the “First” and the “Speed” with very few functional differences between the two pedals except color. Both versions use a molded composite body with cro-moly steel axle and each has the full range of Time anatomical and bioposition features. With only a reported four gram weight difference between the two colors it is difficult to flush out any tangible difference between these two models other than appearance. The third version is the 230 gram reported weight Time RXS Carbon. This pedal uses a lighter cro-moly steel hollow axle to reduce weight.
